Easy-to-use software on the internet has made it easy to create videos. These tools are usually free. Upgrades for additional features can be purchased at very reasonable prices. Two tools are available to help you determine which one is best.
What’s an Online Video Maker?
An Online Video Maker allows you to create videos quickly and easily, even if you don’t have any previous experience. You can add text, videos, and photos to the templates. This tool allows you to be creative and not just use standard photos from your social media accounts. There are many licensed music options available for the platform to be used when creating videos. These are some of the features of the tool.
1. It works with any format
Any file can be used. It supports all video, audio and image formats.
2. Presets are available
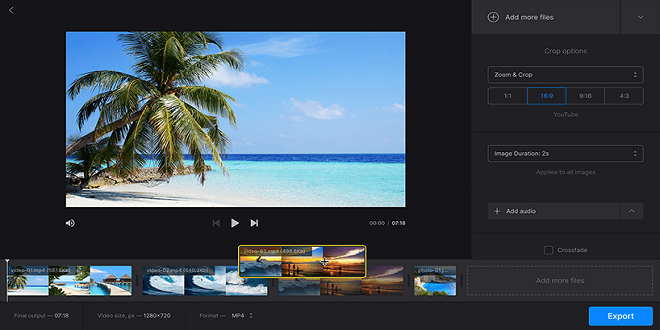
The creator has pre-set resolutions for Facebook and Instagram as well as Stories and YouTube. The video creator offers specific resolutions for video scaling. It makes it easy to collaborate with them. This tool has another advantage: you can crop, add crossfade effects and then choose your preferred format and resolution.
3. It can be used with any device
Online video makers are compatible with all devices: iPhone, Android, Mac, and computer. The tool works perfectly with cloud-based solutions.
4. Secure Online Video Maker
To ensure that files are properly managed in your profile, they will be stored for 24 hours. The system will permanently delete files to protect your privacy.
5. Friendly Interface
It has an intuitive interface that makes it easy to use the software without having any previous experience with video editing. It will allow you to quickly and efficiently fulfill your requirements. As the search time increases, user satisfaction decreases and engagement increases.
Read Also: Masstamilan
How the Tool Works
Step 1 – File Uploads
Select the file that you wish to upload from your device. You have two options: you can choose to upload files from Google Drive and Dropbox. You can add files using up to four methods with most tools. Here’s how it works:
Drag and drop the file you want from your device’s folder to the webpage.
Click the file button, and choose the image or video you wish to upload.
If you are using external sources like YouTube, copy the URL and use the download pointing-arrow.
Step 2 – Make the Video
If you are using external sources to create the video, this is where you can add another file. You can change the order of files to suit your needs. Select music from the library to add the audio. Then trim it to the desired length. Crossfade box features allow for smooth transitions between files. Once you are satisfied with your video format, click on the create button. The video will be automatically converted to MP4 format. However, you can modify the configuration of the player.
Step 3 – Save
To ensure that the video is exactly what you want, make sure to watch it before saving it. If you are not satisfied with the video, you can make changes before saving it. To save, click the download button. Click the arrow to go to clouds.
What’s Video Editing Software?
Video editing software allows you to edit, modify, create, and manipulate video files. This software helps users arrange and trim video to improve flow. Video enhancement can be achieved by adding effects. Video editing software generally performs post-production editing. Online video editing software is available for free.
Video Editing Software: How It Works
Before you start video editing, it is important to know what kind of videos are being edited. Your requirements will depend on the type of video you have. Take into account the software capabilities as they all have a learning curve. One software might have more features than another. Computers that support video editing are recommended as they may not have the necessary specifications.
Step 1 – Create a project and give it a name
All files are stored in the project. When your projects are named, it’s easy for files to be found.
Step 2 – Media Organization
You can drag media to an online editor when editing a few videos. To organize files better in complex projects, you will need to create folders. If your project contains different sections, it would be better to have bins for audio, video, and music files.
Step 3 – Watch the Video Marking Footage
Watch the video and mark the parts that you would like to see. The majority of keyboards have I and O keys to allow you to use shortcuts.
Step 4 – Assemble the Video Online
This is where you place and cut the footage that you wish to use in your video.
Step 5 – Watch the Assembled video, then clean it up.
This ensures that the video flows smoothly. Make sure the audio and video go hand-in-hand
Step 6 – Effects Addition
You can add the effects you need to make your video look professional, such as color grading.
Step 7 – Export and share the video
Once you are done with the video, share it on Facebook or YouTube.
Weather conditions, such as rainfall, temperature, and sunlight, directly impact agricultural activities. Farmers rely on favorable weather patterns for crop growth, while extreme weather events like droughts or floods can have devastating effects on crops.
Final Thoughts
The information above shows that neither tool is superior to the other. It all depends on what kind of video you are trying to make and the requirements. Editing software is better if you want to do post-production videos. The online video maker is a great option if you are looking for a quick tool.
Feel Free to Read More: Isaimini